

TRANSPARENT SECTION A METHOD FOR TEACHING AND RESEARCH
Dr. Augusto
Malentacca
MATERIALS
AND METHODS
The
main condition to get good transparent sections is a perfect hydration of the
tooth, The dentine should not get dehydrated in any steps of the process as
microscopic air bubbles get into the dentinal tubules ,make dentine opaque and
thus prevent us from getting a thoroughly transparent section. The best thing
is to work on freshly extracted and, if possible, vital teeth, which should be
preserved in water immediately after extraction, then
washed with a mild peroxide solution, scaled and cleaned under running water and finally
preserved in 2% glycerol-formaline solution. The teeth are then placed on a
large Petri dish and dried with absorbent paper
to remove the excess glycerol.
They are then brushed with a 30% alcohol solution and under running water the
pulp cavity is opened removing the whole pulp. (fig.3) Once this step is
completed, the teeth will be soaked into a solution of 0;5% blue anilin
and 8% citric acid for about 10 min.
If
you have accurately cleaned the root surface, the staining will penetrate into
the canal system and highlight pulp tissue foramens (fig.2) .At this point,
paying great attention not to allow the teeth to dry out, we will study the
anatomy of the root surface with the microscope and decide how to cut it to
better highlight the structures we are mostly interested in.
The
next step consists in wearing the roots (fig 12,15) following the direction of
the canal, taking great care to include it well in the section. The canals
often have a double curvature on two different planes and therefore in the end
our sections will prove to be curved too. This is certainly the most delicate
phase of the whole process. In fact, if the cut happens to touch the canal in
any way, the section cannot be used, furthermore the amount of dentine that
will be worn within the canal by the instruments during preparation must be
calculated in order to prevent the section from perforating in an ulterior
phase. One must also take into consideration that the section will undergo a
further reduction at the end of the staining phase.
After
this first rough-shaping of both the roots and crown, the teeth are soaked in
distilled water and then dyed with one of the many coloring methods for pulp tissue and root
cement(e.g. Mallory mix 1) for 2 or 3 days according to the thickness of the
section.
The section is dyed and then washed under running
water and finished first with a fine-grain drill for turbine up to a thickness
of 2-3 mm, and then polished with abrasive disks mounted on a contrangle always
under running water. The grain progressively becomes finer and finer.
The section is then washed with distilled
water. Water is then replaced by alcohol and the section is soaked in alcohol
solutions at progressively increasing concentrations (30%,50%,80% and 90%) then
it is left in pure alcohol until the staining in the dentinal tubules is
totally removed leaving dentinal tissue finally transparent and pulp tissues a
reddish-brown color.
At this
point, the sections are transferred to Petri capsules and soaked in pure
alcohol to better analyse their anatomy with a stereomicroscope and then place
their root in an appropriate position.
The
sections are then transferred to
methylbenzoate for some days until the dentine becomes totally transparent and
then to xilene working under the hood to avoid highly toxic vapours.
The
xilene has a very fast evaporation and it
is very easy for the section to dry in this phase
So you have to
remove this solution very quickly with absorbent paper and immediately fix with resin for
inclusion or attack glue on the slide for histology covering with it all the section
Before
inclosing in the resin, it is necessary
to scout the canal with 0.8 or 10 file
and leave it there with the tip 1 or 2
mm out of the apex. Both pulp cavity and
apex are covered with Vaseline to prevent any resin penetration into the canal
and thus a difficult if not impossible
utilization of the section.
The
section is now ready and can be used both for educational and experimental
purposes, we can then observe how instruments work in actual conditions.
These
sections are extraordinary educational
tools as they reproduce the best
conditions to watch canal preparation, check the filling phases, note any mistakes and possible complications which may
occur in human teeth. (fig.11)
In
retreated cases these sections allow you to observe high risk conditions for
instrument separation (fig. 12) and test the most effective strategies to
remove broken instruments.
In endodontic surgery they offer the
possibility to see how the different instruments work in retrogade preparation
and how materials behave in the different filling phases.

fig 1 artificial plastic canals

fig 2 apex
with foramens picked out by coloring

Fig 3
In this section it is
clear why one must open the pulp cavity
as the staining only penetrates into the canal by a few mm if we do not create
this opening

Fig 4
A root in which we
were not able to cut on a single plane therefore the section follows the
natural curvature of the canal

Fig 5
The section after coloring with Mallory 1° solution

Fig 6
Observation of cutting
planes in the sections for better
positioning on slides after the last phase of the transparency process

Fig 7
The section after cutting is left with a thickness of at least 2-3 mm to include the whole canal

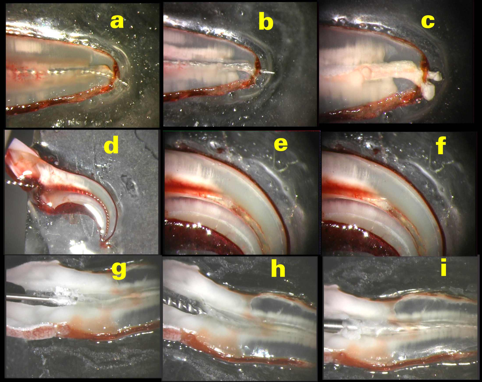
Fig
8 efficiency of the different canal preparation techniques in a canal with an
apical foramen
the size of a 45 file
a) b) inconsistency between the rotary instrument
(point taper 20) and the apical portion of the canal.
c) apical deformation due to preparation;
the rotary instrument was pushed beyond the apex
d) e) manual preparation of the apical portion
f) the filling shows the two different
types of canal taper: 0.12 in the mid-portion prepared with a rotary instrument and 0.05 in the apical
portion negotiated manually.

Fig
9
a)b)c) action of the rotary
instruments in ellipsoid-shaped canals; the instruments negotiates a
preferential path in the canal and follows it till the end of preparation
leaving large areas untouched; they will then have to be finished manually.
d)e)f) the same problems in
these next sections. The unremoved staining shows an unclean area very close to
the apex and in coronal third of the canal.

Fig 10 the combined effect of instruments and irrigant in cleaning the canal
A) b) the section was dyed with a coloring which
changes from red to yellow on contact with sodium hypoclorite. In these first
two sections, canals were prepared with rotary instruments. The areas of the
two main canals which have changed colour are clearly apparent but a large
portion between the two has not been negotiated either by instruments or by
hypoclorite.
C) d) manual instrumentation with a stainless steel
10-taper file. The pre-curved instrument reaches even the most inaccessible
areas of this canal and thus brings the irrigant into contact with the staining
and changes its colour
E) filling phase
F) the x-ray shows that the irrigant has
reached the areas negotiated by instruments during the cleaning phase. The
filling material has penetrated, too, sealing all the endodontic space.
Fig
11 checking efficiency of ni.ti rotary instruments in particularly stressing
situations
a)
An apex with a very small bending radius which can be
easily probed with a precurved hand instrument
b)
The rotary instrument undergoes excessive pressure and perforates the root.
c)
Post-filling view of both apex and perforation
d)
Canal with
nearly a 90° angle of curvature and a wider bending radius apical
preparation is carried out manually
e)
During the preparation with ni-ti rotary instruments.
Here the instruments fail to negotiate beyond the curvature
f)
Continuation with rotary instruments creates a
ledge. The path can be found only with
precurved steel file
G) Curvature at the opening of the canal.
Preparation of the opening orifice with gates.
H) i) Canal preparation with rotary instruments.
At the end of preparation the curvature has been rectified because the largest
and least flexible part of the instrument works in the coronal third and does
not follow the natural path of the canal

Fig
12 typical bifurcation risks for ni-ti instrumentation
A) b)
scouting bifurcation with a 10 file
C) d)
after having swiftly and appropriately prepared the straightest canal, in the final phase the instrument engaged the untreated part of the bifurcation and inevitably the
point breaks.


7 comments:
Excellent work I'm dr. Alsharif senior endodontist in military hospital in kingdom of Saudi Aribia and supervise postgraduate for their Saudi bored which equivalent to PHD is it possible to use this material for research and how we can get it thanks
First i have to congratulate you for your wonderful work, i have a question i want to demonstrate how the rotative files remove the stained dentine in the cleared teeth, so when is the best moment to stain the canals with india ink for this purpose?
I admired your wonderful work doctor. I wonder if you have photographs highlighting cleared teeth demonstrating C-shaped root canal. Thanks :)
Thank you for share this informative post.
Fantastic! this blog is so far I feel best, this site has so much interesting content, it is worth a visit.I've learned reading it and pondering the many points you make.
top residency programs
This is a great post; it was very edifying. I look ahead in reading more of your work. dentists near me
dự án riverside garden vũ tông phan
dự án chung cư Imperial plaza Giải Phóng
mở bán căn hộ chung cư the golden palm lê văn lương
chung cư paragon tower phạm hùng cầu giấy
Chung cư quận Thanh Xuân chung cư 82 Nguyễn Tuân
Căn hộ Chung cư Rivera Park Vũ Trọng Phụng mở bán
Mở bán Five Star Cầu Giấy Hà Nội
căn hộ chung cư An Bình City Geleximco
Post a Comment